

How To Set Time On Cisco Router
Objective
Arrangement time configuration is of great importance in a network. Synchronized arrangement clocks provide a frame of reference between all devices on the network. Network time synchronization is disquisitional considering every aspect of managing, securing, planning, and debugging a network involves determining when events occur. Without synchronized clocks, accurately correlating log files between devices when tracking security breaches or network usage is incommunicable.
Synchronized time too reduces confusion in shared file systems, as it is of import for the modification times to exist consequent, regardless of the motorcar on which the file systems reside. The Cisco Small Business organization Switches support Uncomplicated Network Time Protocol (SNTP), and when enabled, the switch dynamically synchronizes the device time with fourth dimension from an SNTP server.
You lot can manage the system time and date settings on your switch using automatic configuration, such as the SNTP, or manual configuration methods. The switch operates but equally an SNTP client, and cannot provide fourth dimension services to other devices.
This article provides instructions on how to configure the system time settings on your switch through the Control Line Interface (CLI).
To configure the system time settings on your switch through the web-based utility, click hither.
Applicable Devices | Firmware Version
- Sx300 Series | 1.4.7.05 (Download latest)
- Sx350 Series | 2.2.8.04 (Download latest)
- SG350X Series | 2.two.8.04 (Download latest)
- Sx500 Series | 1.4.7.05 (Download latest)
- Sx550X Series | 2.2.8.04 (Download latest)
Configure System Time Settings on your Switch through the CLI
By default, at that place is no configured network policy on the switch. The default LLDP-MED global and interface settings are the following:
| Feature | Default Setting |
| Clock Source | SNTP |
| Time from Browser | Disabled |
| Time Zone (Static) | Offset is UTC+0 |
| DHCP Time zone | Disabled |
| Summer Time (DST) | Disabled |
View System Time Settings on the Switch
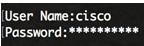
Footstep i. Log in to the switch console. The default username and password is cisco/cisco. If you have configured a new username or password, enter the credentials instead.
The commands may vary depending on the exact model of your switch. In this example, the SG350X switch is accessed through Telnet.
Footstep 2. To display the electric current configuration settings of the port or ports that yous want to configure, enter the following:
SG350X#testify clock [detail]
- detail - (Optional) Displays the time zone and summer time configuration.
The following information are displayed:
- Actual Time - System time on the device. This shows the Dynamic Host Configuration Protocol (DHCP) fourth dimension zone and the acronym of the fourth dimension zone.
- Fourth dimension source - The external fourth dimension source for the organisation clock.
- Time from Browser - Specifies if the appointment and time of the switch is set from the configuring computer using a web browser.
- Time zone (Static) - The time zone for brandish purposes.
- DHCP timezone - Specifies that the time zone and the Summertime Time or Daylight Saving Fourth dimension (DST) settings of the arrangement can exist taken from the DHCP Timezone selection.

Step three. Choose your preferred system time configuration:
- Automatic Settings - If this is enabled, the organization time is obtained from an SNTP server.
- Manual Settings - Set the date and time manually. The local time is used when there is no alternating source of time, such as an SNTP server.
Configure Automatic Time Settings
Step 1. In the Privileged EXEC fashion of the switch, enter the Global Configuration context by entering the following:
SG350X#configure final
Step 2. To configure an external fourth dimension source, enter the following:
SG350X(config)#clock source [sntp|browser]
The options are:
- sntp - (Optional) Specifies that an SNTP server is the external clock source.
- browser - (Optional) Specifies that if the arrangement clock is non already set up (either manually or by SNTP), the system clock will be set according to the fourth dimension information of the web browser in one case a user logs in to the switch, either via Hypertext Transfer Protocol (HTTP) or HTTP Secure (HTTPS).
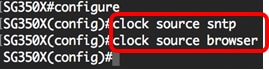
In this example, sntp is configured as the main clock source and the browser as the alternate clock source.
Step 3. (Optional) To display the configured system time settings, enter the following:
SG350X#show clock detail 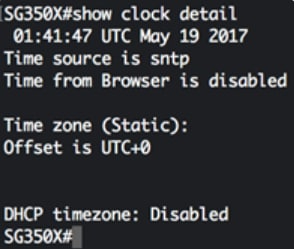
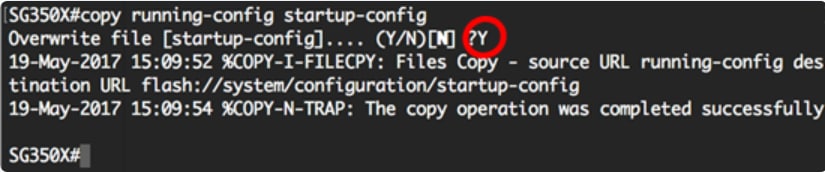
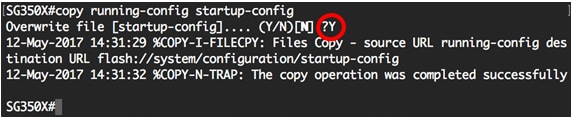
Step 4. (Optional) In the Privileged EXEC mode of the switch, save the configured settings to the startup configuration file, past entering the following:
SG350X#copy running-config startup-config 
Step v. (Optional) Press Y for Aye or N for No on your keyboard one time the Overwrite file [startup-config]… prompt appears.
You should now have automatically configured the arrangement fourth dimension settings on your switch through the CLI.
Configure Manual Time Settings
If no other source of time is available, yous can manually configure the time and date subsequently the system is restarted. The time remains accurate until the next system restart. It is recommended that y'all employ transmission configuration only as a final resort. If you take an exterior source to which the switch can synchronize, you practice not demand to manually set the arrangement clock.
Important: If you accept an exterior source on the network that provides time services such equally an SNTP server, you do not need to manually set the system clock.
To manually configure the organisation time settings on your switch, follow these steps:
Step 1. In the Privileged EXEC mode of the switch, enter the following:
SG350X#clock set [hh:mm:ss] [month] [day] [year]
The options are:
- hh:mm:ss - Specifies the electric current time in hours (military machine format), minutes, and seconds. The range are the post-obit:
- hh - 0 to 23
- mm - 0 to 59
- ss - 0 to 59
- day - Specifies the current solar day of the calendar month. The range is from 1 to 31.
- calendar month - Specifies the current month using the kickoff three letters of the month proper noun. The range is from Jan (January) to Dec (Dec).
- twelvemonth - Specifies the current twelvemonth. The range is from year 2000 up to 2037.
Subsequently reboot, the organisation clock is set to the time of the epitome creation. In this example, the clock time is gear up to 12:15:30 with the clock date of May 12, 2022.

Footstep ii. In the Privileged EXEC mode of the switch, enter the Global Configuration context by entering the following:
SG350X#configure terminal
Step three. To disable the SNTP equally the time source for the system clock, enter the following:
SG350X(config)#no clock source sntp 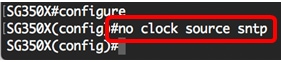
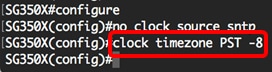
Step 4. (Optional) To ready the time zone for brandish purposes, enter the following:
SG350X(config)#clock timezone [zone] [hours-kickoff] [minutes-offset]
The options are:
- zone - The acronym of the time zone. The range is up to four characters.
- hours-offset - The hours difference from UTC. The range is from -12 to +thirteen.
- minutes-get-go - (Optional) The minutes difference from UTC. The range is from 0 to 59.
The system internally keeps time in UTC, then this command is used only for brandish purposes and when the time is manually fix.
Footstep five. (Optional) To restore the default time zone configuration settings, enter the following:
SG350X(config)#no clock timezone
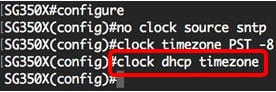
Step vi. (Optional) To specify that the fourth dimension zone and the Summer Time (DST) of the organisation can be taken from the DHCP time zone option, enter the following:
SG350X(config)#clock dhcp timezone
Upon configuring the DHCP time zone, check the following guidelines:
- The time zone taken from the DHCP server has precedence over the static time zone.
- The Summer Fourth dimension taken from the DHCP server has precedence over static Summer Time.
- The time zone and Summer Time remain effective afterwards the IP address lease time has expired.
- The time zone and Summer Fourth dimension that are taken from the DHCP server are cleared subsequently reboot.
- In case of multiple DHCP-enabled interfaces, the following precedence is practical:
- The information received from DHCPv6 precedes data received from DHCPv4
- The data received from DHCP client running on lower interface precedes information received from DHCP client running on higher interface
- Disabling the DHCP client from where the DHCP-timezone option was taken clears the dynamic time zone and Summer Fourth dimension configuration.
Stride 7. (Optional) To restore the default DHCP time zone configuration, enter the following:
SG350X(config)#no clock dhcp timezone
Step 8. (Optional) To configure the system to automatically switch to Summer Fourth dimension (DST), enter one of post-obit:
SG350X(config)#clock summer-time [zone] recurring {usa | eu | {calendar week day hh:mm calendar week day hh:mm}} [offset] SG350X(config)#clock summer-time zone recurring {usa | european union | {[day month year hh:mm] [day month yr hh:mm]}} [offset] SG350X(config)#clock summer-fourth dimension [zone] date [month day year hh:mm] [month day year hh:mm] [start]
The options are:
- zone - The acronym of the fourth dimension zone to be displayed when summertime time is in event. The range is up to four characters.
- recurring - Indicates that summertime time starts and ends on the corresponding specified days every twelvemonth.
- date - Indicates that summer fourth dimension starts on the first date listed in the command and ends on the second date in the control.
- usa - The summertime time rules are the United states rules. The rules are:
- Kickoff - Second Dominicus in March
- End - First Sun in November
- Time two a.m. local time
- eu - The summer time rules are the European Matrimony rules. The rules are:
- Showtime - Last Sunday in March
- End - Last Sunday in Oct
- Fourth dimension 1 a.thousand. local fourth dimension
- week - Week of the calendar month. The calendar week can be one to v, first to concluding. Week within the month when DST begins or ends every year.
- day - Day of the week (start 3 characters by proper noun, such every bit Sun). Day of the week when DST begins or ends every yr.
- date - Date of the month. The range is from 1 to 31.
- month - Calendar month (first three characters by name, such every bit February). Month of the year when DST begins or ends every year.
- twelvemonth - yr (no abbreviation). The range is from yr 2000 upwards to 2097.
- hh:mm - Time in armed forces format, in hours and minutes. Time when DST begins or ends every year. The range are the following:
- hh - 0 to 23
- mm - 0 to 59
- ss - 0 to 59
- starting time - (Optional) Number of minutes to add during summer time. The range is from 0 to 1440 minutes and the default is 60.

In this example, a recurring DST is configured with PST time zone. It starts every 00:00 on the first Sunday of March, and ends every 2d Sunday of Nov. The get-go fourth dimension is lx minutes.
Footstep ix. Enter the leave command to become back to the Privileged EXEC mode:
SG350X#get out 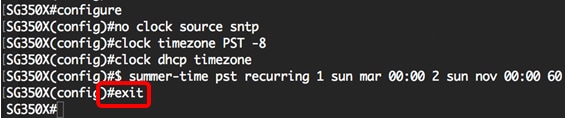
Step 10. (Optional) To display the configured system fourth dimension settings, enter the following:
SG350X#bear witness clock detail 
Step 11. (Optional) In the Privileged EXEC mode of the switch, save the configured settings to the startup configuration file, by entering the following:
SG350X#copy running-config startup-config 
Footstep 12. (Optional) Press Y for Yep or N for No on your keyboard once the Overwrite file [startup-config]… prompt appears.
You have now successfully manually configured the system time settings on your switch through the CLI.
Revision History
| Revision | Publish Date | Comments |
|---|---|---|
| 1.0 | 13-Dec-2018 | Initial Release |

How To Set Time On Cisco Router,
Source: https://www.cisco.com/c/en/us/support/docs/smb/switches/cisco-small-business-300-series-managed-switches/smb5584-configure-system-time-settings-on-a-switch-through-the-comma.html
Posted by: barnessmand1987.blogspot.com
0 Response to "How To Set Time On Cisco Router"
Post a Comment